Fig Cake

Fig picking is coming close to an end here in Portugal, and after a few weeks of eating way too many of them, necessity plus a little out of the box thinking just makes you cook wonderful things. Like this cake.

sem título-1122

fig above

Figs are a big part of Portugal, the south in particular, where you can find a peculiar sweet treat called Queijo de Figo, which literally means fig cheese. It’s like dried fig paste with a mix of nuts and condiments, condensed into a cheese format and texture. Cabrita Neto has developed some tasty concoctions with outstanding ingredients, almonds and cardamom. They even have individual bars, that you can eat as a on-the-go snack. Because, come on, who doesn’t want to eat a tasty piece of fig cheese while walking to work or on a stroll by the coast?

Considering the overflow of this fruit through our lands, plus our cute habit of stopping the car by any road side to pick, we acquired a knack of showing you guys all the ways we love to eat, breath and speak fig.

fig picking

In my home town, at the top near the castle wall close to a garden, there is at least five trees. As soon as summer hits, the fruity smell wonders through the air, and people pop by a branch ever so often to see if any figs are ripe enough to eat. After a few weeks of hot summer heat, beachside adventures and tourist drenched streets, you will find the locals around the trees, with huge poles, that have a sort of tweezer-ish character about it, so they can reach the high branches and pick the out-of-reach fruit. It’s traditionally beautiful.

Not every tree is the same. My grandmother’s tree starts mid August, my backyard trees all sort of begin in September, and a few are still not ready to eat yet.

So, about this cake: it’s a great recipe to add any sort of fruit you wish, and it keeps quite a while considering how moist it is. The lack of dairy provides a sweet treat for a huge group of special dietary people. The original recipe called for only oil, but I have combined half olive oil, so the health benefits are present, without the overwhelming flavor some might not enjoy much in sweets. What sort of olive oil should you use? I prefer to save the extra virgin for salads and bread dipping, use the virgin one for baking as flavor wise it will just combine with the remaining ingredients plus, it will also be cheaper to concoct.

sem título-1090

Ingredients:

  • 250 grams brown sugar
  • 2 eggs
  • 100 ml virgin olive oil
  • 100 ml cooking oil
  • Lemon zest
  • 1 teaspoon cinnamon
  • 225 grams all purpose flour (whole grain for you health nuts)
  • 7 grams baking powder
  • 7 grams baking soda
  • 2 grams sea salt
  • 300 grams figs
  • 4 tablespoons Tawny Port wine
  • Drizzle of honey
  • Powdered sugar
  • 1 tablespoon of butter (ghee for lactose intolerants)
  • 2 tablespoons milk (water for lactose intolerants)

Instructions:

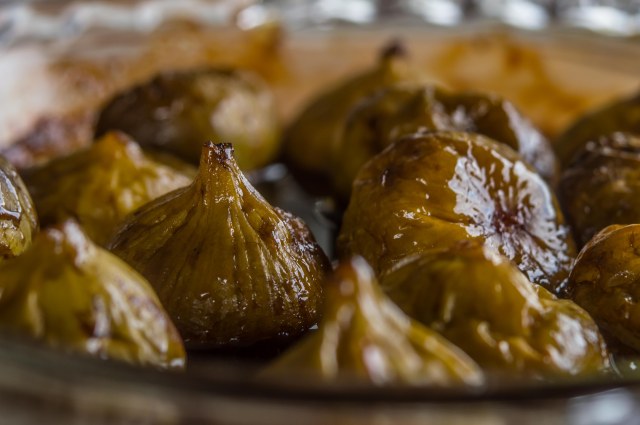
  1. Roast the figs, whole, in port wine and a drizzle of honey. No need to add too much sweet, the figs speak for themselves. Let cool and save the sticky port wine syrup. This will be the base for the glaze. sem título-1079
  2. Beat the eggs sugar, oils and lemon zest for 5 minutes on medium, until a smooth paste os formed.
  3. Sift the flour, bicarb + baking powder, and add to the previous mix.
  4. Add the salt, the roasted cooled figs (cut in quarters).
  5. Place in a cake pan with parchment paper and bake at 165ºC for at least one hour.
  6. Cool the cake, remove from the pan and gently remove the parchment paper. It is suppose to look fairly rustic.
  7. Make the glaze with the roast fig + port wine syrup, softened butter/ghee, lemon zest and milk/water.glazing cake
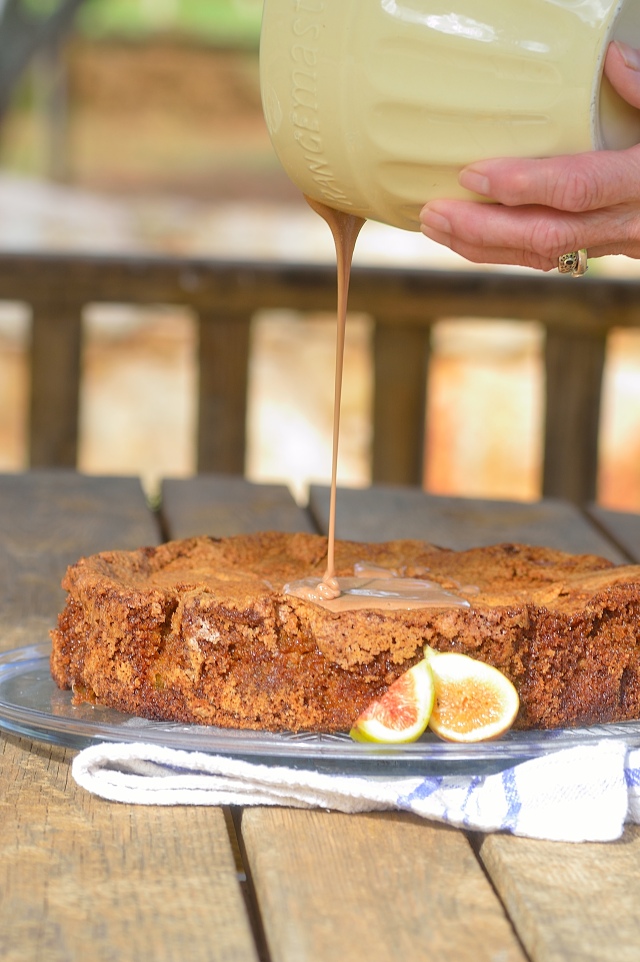
  8. Decorate with quartered figs.  sem título-1113
  9. Eat.

sem título-1129
sem título-1134 sem título-1141

sem título-1150

Any leftovers? Eat it for breakfast, lunch, snack, whenever. It’s just that sort of cake. Goes well with everything and everyone, if you’re wondering.

sem título-1140

My dog also enjoyed gazing at the cake.

Olive Oil Chocolate Mousse

First of all, I have to thank my dear friend N (i’m not spelling his whole name, but he knows it’s him!) for providing this healthy recipe of one of the most decadent desserts I know.

Don’t take me wrong, I love butter! But olive oil in a mousse? Chocolate mousse?! That’s just plain nutrition genius.

up above mousse

Best topping for a chocolate mousse? Salt. Pink pepper is also very nice.

Besides giving you the recipe, I’m also going to share my cooking experience by adding more or less sugar and chocolate to the mix. Obviously the best recipe is the one with more sugar and chocolate! And I’m about to explain why.

mousse with me

If you look closely at the spoon, you can actually see me taking the picture!

side mousse 2

The first attempt was the low cal recipe, where one tablespoon of sugar per egg is added, with 100 grams of dark unsweetened chocolate and two tablespoons of olive oil.

Ingredients:

  • 7 eggs (separated)
  • 7 tablespoons of sugar
  • 2 tablespoons of olive oil
  • 100 grams of dark unsweetened chocolate
  • 1 teaspoon sea salt

Procedure: Melt the chocolate with the olive oil and the salt (save some for sprinkling before serving), making sure it does not pass 50ºC. Beat the yolks with the sugar. Incorporate the melted chocolate (when luke warm). Beat the egg whites. Fold the yolk mix into the whites, gently. Spoon into ramekins and let set in the fridge at least one hour before serving.

Now, the low cal recipe was quite a challenge, as I noticed the egg whites didn’t set very well (no added sugar, and don’t expect cream of tartar will do the trick, it is great for an even whiter effect, but not so good at maintaining the whip). The lack of sugar also contributes to a faulty consistency, besides using half the chocolate, which led to lack of cohesiveness. By the next day, the mousse had egg white at the bottom, and just didn’t have the right fluff to it, especially because there was too much available water, ready to leak and ooze out of the protein web (the richer the web, with chocolate, sugar and fat, the easier it will solidify and prevent separation, in a cold envoirment).

The best version of this recipe, decadently delicious and healthy (just because it doesn’t have butter!), has double the chocolate (yum) and four more tablespoons of sugar.

So the best recipe is here:

  • 7 eggs (separated)
  • 11 tablespoons of sugar
  • 2 tablespoons olive oil
  • 200 grams of dark unsweetened chocolate
  • 1 teaspoon sea salt

close up mousse

A trick my patisserie teacher taught me in my second year of college was to slightly warm up the egg whites, until it is warm to the touch, before beating. This supposedly helps keep the whites from separating while in the fridge for prolonged periods of time. As a fact I have researched this, it seems to be quite an antique procedure, for when electrical appliances were scarce, and beating was done manually. I do it anyway, as I can tell a difference, specially when making lemon merengue pie. Just remember to do this over a pan of hot water, and keep stirring and checking, so the mix doesn’t coagulate. It also helps build them and maintains them steady through cold environment without separating the water from the protein. By the time the egg whites are warm, you can start beating, and add two tablespoons of the sugar when they are nearly ready.

The procedure for this recipe is the same as the previous low cal version. Remember to eat within the following three days (raw eggs).

side mousse

If your mousse sets like this on it’s side, then you made a good consistent recipe.

Reading Harold McGee’s On Food and Cooking – The Science and Lore of the Kitchen will help you understand the science of making a mousse, even if you are a kitchen newby – this is where I got all the information for this post. It is also my food bible.

Another plus about adding the extra sugar and chocolate, is the fact that you don’t even notice the olive oil flavor (for whoever does not appreciate it). Sorry if you are diabetic, I cannot help you with this one (you can try adding frutose, I personally don’t appreciate it because of the metallic after flavor, or isomalt).

Something I have to warn you about this recipe is using raw eggs. If you are a food professional like I am, you know that in your establishment you should apply HACCP knowledge and pasteurization techniques, but it’s also a harder process to achieve good mousse like consistency. By applying the bombe technique, the eggs lose aeration properties, and so lingers the need to use gelatin leaves, which gives a hell of a lot more trouble, and will alter the flavor. Non the less, you should try it out, push your patisserie capacities to the limit, so you can understand why this and that happens!

spoon mousse 2

Look how the mousse stays steady on the spoon – that’s the perfect, fluffy, gorgeous consistency a mousse should have.

spoon 2 mousse

Not pasteurizing eggs is a microbiological hazard, it is a petri dish of salmonellas, possibly a few campylobacter’s and plenty other egg loving bacteria. But hey, so many, and I mean soooo many people, including chefs and food eccentrics have risky eating habits, like raw oysters that are very dangerous because of the toxins that can act in seconds, leaving you near your death bed (PSP, DSP, NSP and ASP). Oh, the irony. But as Anthony Bourdain once said, “Your body is an amusement park. So enjoy the ride.”. This guy knows stuff.

Make the damn mousse with raw eggs, you will live.

If you are, however, prone to food disease or have a weak imune system, I advise you to purchase pasteurized eggs, or research how to do la bombe technique, where you pasteurize the eggs, with a 121ºC sugar syrup. For smaller quantities, you can use a microwave until the eggs, sugar and a bit of water reach 85ºC (the water is necessary, as it will evaporate, if it is not present, the eggs will scramble) and then beat till cool. Although this is the safest technique, and highly required in the restaurant business, it does lack substance and successful aerating. To counteract this, use gelatin leaves and whipped cream. But that’s a whole other recipe itself, far away from the purpose of this one, which is to opt for a dairy free ingredient.

choco 1

empty mousse

I used a leftover jam jar and a white ribbon, for presentation purposes. But I also choose many different jars, with different sizes, because everyone wants a certain amount.

nearly empty mousse

I couldn’t help myself. I had to eat it while photographing for this post.empty empty mousse

About the olive oil to use, and the best that Portugal can offer, I’m saving that for a future post. I think I might have overwhelmed you a bit with too much technical/scientific patisserie information. So – Keep Calm and make that mousse! 🙂

Carob brownies

The carob tree is widely known and found throughout mediterranean lands. Planted and cultivated by the arabs, and furtherly maintained by future generations who cherrished the utilities of this plant and fruit.

Before the sugar cane was imported, carob flour and syrup were used as sweetners, like honey and beetroot were too.

Only recently has the carob byproducts become popular for dietetic purposes, but for many years it has been a popular potuguese dessert ingredient, and a reflection of our inherited culture.

Also known for medicinal treatments (colds, flues, intestinal issues), and also known as the best cocoa substitute because fat content is lower (more carbs and fiber, that’s why carob is sweet and cocoa is bitter), no allergens, nor stimulants. Very rich in vitamins and minerals, like A, B, niacin, calcium, magnesium, iron, etc.

The food industry has developed many desserts and sweets thanks to this ingredient’s emulsifying, thickening and flavourfull properties.

A remarkable curiositie about the carob tree is it’s ability to survive in dry hot climates, enduring long periods without water. The fruit grows into a sort of pod, where tiny carot size seeds linger (these were actually used to measure a carot of precious stones hundreds of years ago – science later on proved that the size of the seeds/beans isn’t always the same). After drying, the subproducts are obtained (the leftover pods are worthwhile for animal feed) and sold in many supermarkets and health food stores.

Portugal is the forth most productive country in the world! Horray for us!

IMG_4712

Although I love cocoa, I’m always keen to pursue interesting and available substitutes, and carob flour goes remarkably well in a brownie recipe – even if you don’t like the ingredient, you will love it this way!

Instead of butter, I use avocado, so dairy free and no saturated fat. Just to make it even healthier, whole wheat flour and coconut sugar! Try it out, you won’t be disappointed.

IMG_4699

The original recipe (with butter, chocolate/cocoa) is from my Better Homes & Gardens cookbook (oh, my mother’s, she asked for royalties, sorry), it’s the best version of brownies I’ve ever made. I topped my recipe with some almonds and served it with nectarine slices and a plum coulie my mother made, to use up the plums that were falling desperatly off the tree. Very sour, but excellent to balance the flavors and cut the sweetness.

20140728-115323-42803741.jpg

The recipe:

  • 1/2 cup carob flour
  • 1/2 cup cocunut sugar (or brown)
  • 2 eggs
  • Pulp from 1 avocado
  • 3/4 cup whole wheat flour
  • 3/4 cup almond milk
  • 1/2 teaspoon vanilla

Just blend the wets, mix in the dry (carob and whole wheat flour) and bake in 170ºC oven for 20-25 minutes (I like my brownies very fudgy, so I always take them out ahead of time).

20140728-115344-42824183.jpg

Pho-nomenal!

I simply love noodles, nothing amazing about them, but astonishing if served with the right ingredients.
The Pho is a vietnamese kind of ramen, usually a best seller for street food lovers, also a staple breakfast for locals. It’s packed with all necessary nutrients, a complete meal to start off the day.

IMG_1418

Making this oriental classic is all about the broth. A bit labor intensive yet such a cooking lesson! You will soon see why.
First and foremost, go by your best butcher or meat purveyor and get some beef bones, if they like you, best chance you will get them for free. Buy about 2 kilos.

Now, this trick isn’t a novalty, but I guess many people don’t usually use it – cleaning the bones. Boiling them in water for about 10 minutes will extract a large quantity of impurities. Discard the water and wipe off any leftover scum (do not touch the marrow). Set aside, and prepare the vegetables:
– 2 large onions, skin on
– 1 garlic head, cut in half
– 5 slices of ginger (about 1/2 cm thick and 4 cm long)
– 1/2 bulb of fennel

Toast the veggies on an open flame, with some tongs. Careful not to burn the skin of the onion and garlic, if by any chance you find this difficult, use a torch and finish off in the oven (180ºC), do not burn the garlic, and take the ginger out before the other ingredients.

IMG_1333

IMG_1337

Mix the veggies with the bones, top with water (triple the water to the amount of solids) and add the following spices:

  • 3 cloves star anise
  • 2 cinnamon sticks
  • 1/2 tablespoon of peppercorns, corriander and mustard seeds
  • 1 teaspoon of cloves
  • 5 cardomom seeds
  • salt
  • brown sugar

IMG_1342

Now, you can grab a beer and relax! Four hours of waiting until this baby starts to smell brothy. The best solution is to make it ahead of time, like the day before, or doubling the batch and freezing for future nosh.
By the end of the cooking process, add the fish sauce, and make sure the flavors are balanced. Look for the sweety, salty, tangy aromatic broth. Now, it will look quite dense, which is normal, the next step is to purify the broth. First strain it, to remove veggies, bones and spices. Then you can do one of two processes: strain again through a kitchen cloth (like a cheese cloth) or use egg whites (gently warm up the broth with raw egg whites, when coagulation point is reached, strain it again with some kitchen towel). I can’t assure which process works best, although I have heard the egg white might remove flavor, but it’s an amusing experience to do, the difference between the before and after broth is outstanding!

IMG_1392

The before broth

IMG_1404

The after broth – looks like a consommé 

Vietnam, like most oriental countries, uses rice as a primary staple food, this goes for the noodles as well. I advise the ones that kind of look like taglietelli, very yummi and soak up more flavor from the surrounding. Be careful cooking the noodles, it’s a very quick process, so use already boiling water, and as soon as they are done, pass through cold water to prevent mushiness. You will also need to prepare the following:

  • stir fry mung bean sprouts
  • thinly slice some tender beef (against the grain people! Always!)
  • slice fresh chillies
  • pick fresh herbs (cilantro, basil and mint), chop half, keep some whole leaves for decoration
  • cut up one lime into squeezable wedges

Plating: stack some noodles in a bowl, top with raw and possibly cooked meat (leftover from the bones), pore on hot broth, finish with stir fried (or raw) mung bean sprouts, fresh herbs, chilli and lime.

Avocado, cocoa and roast banana cream pie

Yet another recipe developed for class, diet pastry last semester. Such an easy dessert to make, inspired by vegan pinterests I’ve been following, and a huge breakthrough for my eating habits, like incorporating an avocado in a dessert (I don’t even like the damn fruit).

So basically, the first step consists in baking a tart base. Gluten-free if you need it (I did for my project), if by any chance, you are not allergic to gluten, the fact you choose to gluten-free products/recipes/ingredients, won’t make you any healthier. Freakishly disturbing the amount of crazy people out there that think this is true, well, it’s not. (Although lactose is a whole different story, I promise to dish out the info sometime soon)

The filing is the most simple thing I have ever cooked, for a moment I felt quite ashamed about presenting such an uncomplicated technique, but what the heck, whoever is on a diet will never what to make such an effort doing so.

Just to embellish the dish a little, I garnished the plate with some bruléed banana slices, slithered almonds and cilantro flowers. Pretty darn simple, yet beautifully composed.


IMG_2915


Tart base (gluten-free):

  • 256 grams gluten-free flour
  • 2 grams salt
  • 100 g margarine
  • 1 egg
  • 1 tablespoon apple cider vinegar
  • 4 tablespoons cold water

Procedure: mix flour with the salt and incorporate the cold margarine with finger tips, without giving it too mush heat. While using the twirly ends of a beater (if you have a kitchen aid, use the dough hook), add in the previously beaten egg with the cider vinegar, and the cold water, one tablespoon at a time. Mix till combined, cover in plastic wrap and let set in the fridge for about 30 minutes (not because the gluten needs to relax – there is non! – but to firm up the dough before rolling it out).

Roll out the dough, as thin as you possibly can, fill and form a mini tartlet dish and blind bake it with weights (dried chickpeas or beans on parchment paper), at 175ºC until golden and firm.


IMG_2917

Filling:

  • 1 very ripe avocado
  • 1 whole roast banana (with skin, until completely black)
  • 3 tablespoons honey
  • 20 grams low fat, dutched cocoa (the darker it is, higher pH and much more intense dutch process)
  • 1 tablespoon soy/almond/lactose free milk

Procedure: blend all ingredients (just don’t forget to take the banana out of the peel). So simple. Next, you just need to fill the tartlet, add garnishes and voilá.

If by any chance you do not know how to brulé banana slices: cover the surface of the wedge with sugar, use a torch to caramelize it, just beware about doing it to ahead of time, sugar is way hygroscopic, aka absorbing too much moisture from surrounding air, it will get soggy and loose that brulé crunch.